by Sara Barry | Jan 19, 2016 | cooking, use what you have, what's for dinner
I’ve been in a kitchen rut. 
I cut down on the “what to make for dinner” dilemma by meal planning (so resistant to doing, so glad I did), but I was getting bored. Last week my friend Lilly hosted a winter recipe jam that got me excited about food again.
I almost said cooking, but really it’s the food. I started reading this book last night and it made a clear distinction between enjoying cooking and enjoying food. I like both, but I’m coming back to the food—the eating, the sharing, the memories, the stories.
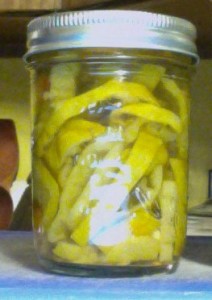
For the recipe jam, I pulled a jar of pickled peppers from my cupboard and asked, “What would you do with these?”
The answers came in:
sprinkle on pizza
serve with sausage
toss with greens
add to white chili
use on nachos . . .
None of it was earthshakingly new. I was just in too stuck in what we usually do. I think first of fresh peppers for nachos. I turn to dried for chili. My kids are back on forth on spicy. The little one won’t eat a fried egg sandwich without Tabasco sauce. They’ll both eat our homemade chili. Except on the days they won’t. “Too spicy.” So too often I skip it.
I opened a jar to have with pork dumpling burgers (dumpling filling pressed into burgers). The suggestion to use the hot peppers on pizza with sausage reminded me of stuffed jalapenos (and that I had an overabundance of cream cheese in my fridge.) A few nights later, I sprinkled the rest of the jar over a corn-meal crusted pizza with spicy sausage, cream cheese, and a Mexican blend cheese.
Definitely not rut material.
Hot Pepper & Sausage Cream Cheese Pizza
Crust
3/4 c. warm water
1 tsp yeast
hefty pinch of sugar
1 1/4 c. flour
1 cup cornmeal
1 1/2 tsp kosher salt
1 Tbsp olive oil
- Sprinkle the yeast over the warm water and add the sugar.
- Put both flour and the salt in a large bowl and combine.
- When the yeast has bubbled up, add it along with the olive oil to the flour.
- Stir to combine. Then knead lightly.
- Coat the dough in oil. Place back in the bowl and cover with a towel. Set in a warm space to rise. My dough didn’t double, but it expanded.
- Preheat oven to 425.
- Sprinkle a pizza stone or pan with coarse corn meal. Stretch the dough into a round (or several small rounds).
- Bake for about 15 minutes until dough starts to set.
Topping
1 8-oz package of cream cheese softened
cooked spicy sausage
1 4-oz jar pickled hot peppers (or chopped fresh jalapenos)
shredded cheddar, Mexican blend or similar cheese
fresh salsa or pico de gallo
- Spread the cream cheese on the partially baked crust.
- Sprinkle the sausage and peppers evenly over the pizza.
- Top with the shredded cheese.
- Bake until the cheese is melted and the edges of the crust are just turning golden.
- Serve with fresh salsa.
by Sara Barry | Oct 28, 2015 | cooking, fall, use what you have, what I love, what's for dinner
Boom! cruuunch
“What happened?” my big girl asked from the seat behind me, her question mirroring my own momentary confusion.
“Somebody hit us,” I said stunned.
She was OK. I was OK, but shaken, badly. All week, I was tight and anxious. All week, my stomach has churned as I called the insurance company, filled out forms, waited for call backs, avoided thinking about what could have been.
All week, still off-kilter, I needed grounding, so I stepped outside. I welcomed the golden afternoon autumn sun, warm on my back. I breathed deep the cold smell of fall. While my kids jumped in piles of yellow and browning leaves, I pulled plants soft and straggling after our frost. I loosened the cold earth and dumped wheelbarrows of compost. And I planted garlic. 
Garlic was the most satisfying thing I grew in my garden this year. I don’t know why I haven’t grown it before. I loved every step from the early green points poking out of the earth to the graceful curved scapes that I cut off for pesto to the bulbs themselves that I dug a few months ago and hung to dry.
I love this starting point too. It’s time to plant garlic again, now when everything else is wrapping up or just hanging on. Now while I’m pulling dead plants and putting the garden to bed for spring. I love the hope of planting, even if it means a long wait. All winter, I’ll know that my garlic is out there under the soil, under the snow, waiting for spring sun, ready to push up shoots and get going.
Garlic didn’t ask a lot of me. I picked the scapes and dug the bulbs. I ate the scapes quickly, and the bulbs will stick around for a while (though we go through garlic pretty quickly around here). 
Garlic was simple in the garden and it’s simple in the kitchen. I’ve been making this easy garlic bread for more than 20 years now, since I first learned it in an Italian kitchen.
Garlic Bread
1 loaf good, firm bread
1–2 cloves garlic peeled and halved
olive oil
kosher or sea salt
- Slice the bread and toast it under the broiler just until it starts to take on a little color. Flip the bread and toast the other side.
- Arrange the toast on a platter, and while it is still warm, rub one side of each slice with the garlic.
- Drizzle with olive oil.
- Sprinkle with salt.
One of my favorite fall dinners is this garlic bread served with greens (sauteed with more garlic) and white beans. Some nights I’ll add sausage (my favorite is garlic and cheese—yep, more garlic—from our local market) or mushrooms. Some nights I just keep it at beans, greens, and bread. Simple. Quick. Satisfying.
by Sara Barry | Jul 29, 2015 | abundance, cooking, summer, use what you have, what's for dinner
It’s a weird garden year. My green beans haven’t done much yet. My zucchini and summer squash are succumbing to powdery mildew, and I’m hoping the cucumbers don’t follow. I’m still waiting to see if my tomatoes will hang in there.
But my snap peas produced.
To use up a bunch earlier this month, I did a stir fry with beef and peas and garlic scapes and ginger. To finish it off, I added a heavy splash of coconut milk. That left about a cup of coconut milk.
I kept thinking coconut + chocolate = yum. Since it’s summer, ice cream was the obvious answer. I’ve since subjected my kids to the same stir fry (not their favorite) again both because I had a lot of peas and because I was craving another batch of this ice cream.
Chocolate-coconut Ice Cream
(makes about 5 cups)
½ cup milk
½ cup sugar (scant)
8 oz bittersweet chocolate chips or bar roughly chopped
1 cup coconut milk
1 cup 1/2 and 1/2 or light cream
- Pulse the chocolate and sugar in a food processor until chocolate is very small.
- Heat the milk in a small sauce pan until it just starts to bubble at the edges.
- Add hot milk to the chocolate-sugar mixture. Stir or run the food processor until chocolate melts and mixture is smooth. Pour into a 2-quart or larger mixing bowl. Chill. (I left it overnight, but you can chill for less time as long as it gets really cold.)
- Take the cold chocolate out. Try not to stand at the counter eating it all. (It’s really good, but the ice cream is too.) Stir the 1/2 and 1/2 or cream into the chocolate mixture.
- Pour into your ice cream maker, following instructions.
- My machine takes about 25 minutes. Transfer the ice cream to a covered container and let set for about 2 hours—or eat right away. This one’s really good in it’s soft stage.
by Sara Barry | Jul 22, 2015 | abundance, cooking, kids in the garden, kids in the kitchen, summer, use what you have, what's for dinner

Waiting for green coriander—and keeping the pollinators happy
Tick Tick Ticktickticktick
A cluster of tiny green seeds rolls through my fingers into a plastic bowl.
“I think everyone really loves my green coriander pesto,” my big girl says as she strips seeds from the plants I’ve pulled. “Well, except for some of the kids. Because they’re picky.”
She’s been anticipating this moment since early spring when I began finding cilantro everywhere. We noticed the plants getting bigger and sending out feather, carrot-top like leaves. We watched bees buzz the tiny white flower clusters. And we found the first tiny green seeds. Now, some of the plants have gone from full flower to full seed.
To everything its season, and this is the season for green coriander.
Two years ago, I cooked with green coriander for the first time, making the green coriander–marinated chicken from Grow, Cook, Eat. Picking green coriander (and later the dried, brown seeds) became a summer afternoon activity with the kids asking if we could pull one more plant to strip. As long as everyone had their own plant and their own bowl, squabbles were minimal.
Last summer my big girl decided we should make pesto with the green coriander. We talked about the things that usually went into pesto and she picked what she wanted to put in. Here’s what she came up with:
K’s Green Coriander Pesto
1/2 cup green coriander (roughly seeds from 3–4 plants)
1 scant cup parsley leaves
1 clove garlic
1/4 cup chopped walnuts
1/2 cup olive oil
Two good squeezes of lemon juices
1/4 cup Parmesan cheese
1/4 cup Romano cheese
- Run the green coriander, parsley, garlic, and walnuts in a food processor until smooth-ish. (The green coriander will still be a little pebbly, but all the seeds should be somewhat ground up.)
- Add the olive oil and lemon and whiz to combine.
- Stir in the cheeses.
- Taste and add more lemon juice or oil if needed.
This has a crunchier texture than most pesto. We love it on chicken and crackers. We’re less fond of it on pasta. I imagine that the bright green, citrusy flavor would be good with fish or shrimp.
***
My big girl was so excited to bring green coriander pesto chicken to a pot luck last night. If rosemary is the smell of jealousy, maybe green coriander is the smell of pride.
What are you creating with summer’s bounty these days?
by Sara Barry | May 21, 2015 | cooking, use what you have, what's for dinner
A long time ago, several life times it feels, I spent a semester in Florence. In May, after classes ended, my friend Kate and I took the train to Spain. When we tried to get our tickets in Italy, they told us we couldn’t do it. What they meant, was we shouldn’t.
It was a long, long trip, and despite the Nutella we always traveled with, we were exhausted and starving and parched when we arrived. I set off with my Sesame Street Spanish to get us two waters, while Kate went to get us some sustenance. She came back with Spanish tortilla sandwiches—egg, potato, onion on crusty bread. Like I said, I was delirious and famished, so my judgment may have been clouded, but it was the perfect food.
Kate and I tried to make Spanish tortilla for 10 years before we got it right. This was pre-Internet age. There was no All Recipes or Food Network or Google. We relied on our memory and experimentation. We searched the the rare Spanish cookbook. Finally we found the secret—cooking thin slices of potato in oil, almost simmering them until tender.
It uses a lot of oil, and it’s a great thing to make when you are hanging out with friends in the kitchen with a bottle of red, but sometimes I crave it when I don’t have that kind of time or company.
Here’s my lazy version. It would serve nicely if you had just come off a 20+ hour train ride. It would also be lovely with a salad of bitter greens with a simple vinaigrette for lunch or served as part of a spread of tapas with sangria. I enjoyed my most recent one with dark coffee and toast with olive oil. Eat it hot or room temp. It’s delicious either way.
Lazy Spanish Tortilla
6 medium potatoes, sliced
1 large onion, sliced
olive oil
salt and pepper
5 eggs
5 Tbsp (or glugs) of milk
foil
10-inch skillet
- Slice the potatoes and onion (a mandolin slicer works well for this).
- Oil a large piece of foil. Layer the potatoes and onions in the foil, sprinkling each layer with salt and pepper. Drizzle heavily with olive oil and fold up foil to form a closed packet.
- Cook the potato/onion packet on the grill until potatoes are soft. Eat some for dinner and save the leftovers for your tortilla.
- Beat eggs and milk and set aside.
- Heat a skillet and coat lightly with oil. Layer the remaining potatoes/onions in the skillet. Cook for a few minutes to reheat.
- Pour the egg mixture over it. Cook until egg starts to firm up. Use a spatula to pull the edge of the egg away from the side. Tip the pan to let the uncooked egg slide underneath.
- When the egg is mostly cooked, slide a spatula around the edge to loosen. Place a plate over the pan. Hold the plate tight and flip.
- Slide the tortilla back into the pan and cook the other side for a minute. Serve.
by Sara Barry | Oct 22, 2014 | abundance, cooking, fall, grief, use what you have, what's for dinner, writing
Some people waste away when under stress or grieving.
I eat.
When my son was in the hospital, I ate cookies and candy because I had them, big, heavy restaurant-sized meals. I ate whatever plate or dinner people brought me. It didn’t matter how hungry I was or if it was what I wanted (don’t get me wrong, people brought us good stuff); I just ate.
But after he died, when I was home, I cooked.
I made soups and stews, mac and cheese, scalloped potatoes, chicken pot pie. I sautéed greens that I got at the farmer’s market. I toasted bread from the bakery, rubbed it with garlic, drizzled it with olive oil, sprinkled coarse salt.
Maybe I was trying to satiate a hunger not related to food. Maybe I just needed food from home after not being there for three months. Maybe the rhythm of the kitchen soothed me, kept me busy enough without requiring too much thought or energy.
I cooked and I ate, and although the grocery store was a gauntlet of anxiety—ignore the birthday cakes, don’t go down the baby aisle, hold your breath hoping the cashier won’t ask anything about kids—I shopped for food. I went to farmers markets. I paid more for cheese than I should have. I got a farm share of meat and bought local eggs and honey.
I hadn’t worked for almost seven months and was limping along trying to get my sluggish brain to function enough to get through the projects that fell on my desk. B. was going to quit his job come fall to go back to school. I had no business spending extra money on food, and months later when B. actually did quit his job and I readied for another self-paid maternity leave, I gave up the farm share, started buying conventional eggs more and more, cut back on the cheese.
But still I cooked. Still I ate well, and I still took comfort in food.
These days, I still cook, still like to choose good food, still like to do something with the veggies I bring in from the garden. Though with little ones pouting, “I won’t eat that” without even trying it, some days I want to go on a hunger strike, holding out on making food until they are hungry enough to eat whatever it is.
Last night I made potato leek soup with potatoes and onions and carrot and herbs from our garden. I served it with garlic toast with cheese. We started dinner with two whines, but eventually one ate the soup and one at the grilled cheese (it worked better when we put the toast together and called it that). I sat back and enjoyed both.
It was a chilly day, and soup was comforting and warm as the darkness gathered. Comfort food isn’t just for hard times; sometimes we just need to feel cozy at home.
What’s your favorite comfort food?
Potato Leek Soup
olive oil or butter
1 stalk celery, diced
1 large carrot (or equivalent), chopped in half rounds (or quarters if the carrot is fat)
1 ½ cups chopped leeks* (approximate)
salt and pepper
2 quarts broth **
5 medium potatoes, peeled and diced
2 sprigs rosemary
2 sprigs thyme
1 bay leaf
large splash heavy cream (optional, but recommended)
- Sauté the carrots, celery, and leeks until softened. Sprinkle with salt and pepper.
- Add the broth, potatoes, and herbs. Bring to just a boil and lower the heat. Simmer for a long time until the potatoes start to break down.
- Look at your soup and debate whether to bother puréeing it. Take a taste. Wonder if you should add milk like you usually do. Take a Facebook poll.
- Use an immersion blender to smooth out the soup, leaving some small chunks. Taste again. Add a hefty splash of heavy cream if you have it.
- Serve with garlic toast, cheesy or not, and hope your kids will eat it without too much of a stink.
Notes
* I actually used Egyptian walking onions in this version. I included any green parts that looked vibrant. They fade as they cook, but still taste good.
** I used homemade chicken broth this time, because I happened to have it in my fridge and wasn’t in the mood for chicken soup, but I’ve made great soup with canned/boxed chicken or vegetable broth. I went heavier on the salt because I knew my base was lower in sodium.


